outside of welding, there's only two different things that you can do to sheet metal. you can shrink it and you can stretch it. any time damage occurs to sheet metal, or you deliberately change the shape of it, the metal is now stretched out. no matter what correction you do to remove the bend or dent, it will never be the EXACT same as it was before (even though you may consider it acceptable and within tolerances) unless the metal is shrunk, to reverse the stretched area at the site of infliction. the two ways to shrink sheet metal, include heat, and compressing the metal. all that being said, it doesn't really matter much when doing something as small scale as straightening out your sheet metal engine parts prior to installation, which is what this article is going to focus on. all of this is easy for anyone to do without any sheet metal experience. the goal is to simply average everything out so there's no visable dents and the gaskets will seal on a flat surface.
chances are, every piece of sheet metal you took off, when rebuilding your engine is going to have some mild damage to it... whether someone pried heavily on it to break the seal, or someone jacked up the car under the oil pan, or everything was simply over tightened. lets go over the solution to each.
valve covers and plug wire covers: these are almost always over tightened and bowed out in the middle. the early valve covers have less strengthening ribs in the stamping, so therefore the over tightening damage to them is much more pronounced. to make them square again, simply put them in a vice, over the ribbed stamping (bolt hole area) and squeeze them back into shape as shown down in the pics. the ribbing is where the damage occurred, so therefore that's where the damage needs to be reversed. pinch it a little further than you need to, doing a little at a time. sheet metal will spring back a little when you release. also check lip for kinks in it from people prying the valve cover up to break the seal on it. obviously you want to do all this prior to paint. i have no idea why plug wire covers are so stretched out by people. they literally only need to be on finger tight.
valley pans: these see the most damage. people continue to over tighten them because they don't want to spend the time to pull the intake to change the gasket. the 64 to 66 valley pans are especially weak and easy to turn inside out via over tightening. shown below is the strengthening creases, outlined in white dots that fold under too much torque. simply flip the valley pan over and use a dull, wide chisel and a heavy hammer to bring the creases back, and bring strength and shape, back into the panel. once the valley pan gets stretched beyond "center," it will no longer have tension on the gasket surface. the earlier valley pans just typically become U shaped on the center strengthening rib from over tightening. that damage is hard to repair without a press, but it can be done. 53 to 62 valley pans with road draft baffle, always must have the baffle removed and contamination cleaned out. especially if the valley pan was tanked and/or blasted. i've written an article already dedicated to that, further down the list.
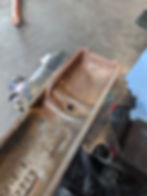
oil pans: not uncommon to find yourself with an oil pan that someone used to jack up the whole car, or engine was carelessly laid on top off when out of the car, that's heavily caved in or otherwise damaged. these often get stretched out heavy in the sump from damage, but as long as you average out the dents and get it back into the general shape, then you are ok. this is the most important piece of sheet metal on the engine to make sure is straight. pickup is super close to the pan sump. any slight damage can/will restrict and starve the engine of oil. on the oil pickup screen cups, i always use a hole punch and punch a couple small holes in case the pan ever caved in, on the road, the pickup would still oil. to straighten out the pan skin, i use 3 tools with a big hammer. chunk of aluminum, 2x4, and wide tipped brass pinch for the corners and tight rolled edges. simply hammer it out on a steel table or concrete floor until you've got it looking good. area around the bolt holes is always sharp from being stretched out by the mounting hardware. sit the lip/pan rail on a metal bench edge and beat down that sharp area around bolt holes which can actually split the gasket. look for damage to pan rail from people using a pry bar between bolt holes. that damage is common and can be semi difficult to correct and make straight again because of the close quarter stamping that's fighting you. a press is helpful. NEVER pry the oil pan off the engine in between the pan bolts, always pry OVER the top of the pan bolt holes.
get asked constantly about torque specs of sheet metal parts. all torque specs are in the other tech info section of the website. i have never used a torque spec on a sheet metal cover in my entire life. snug it down with a 1/4" drive stubby ratchet and you're done